

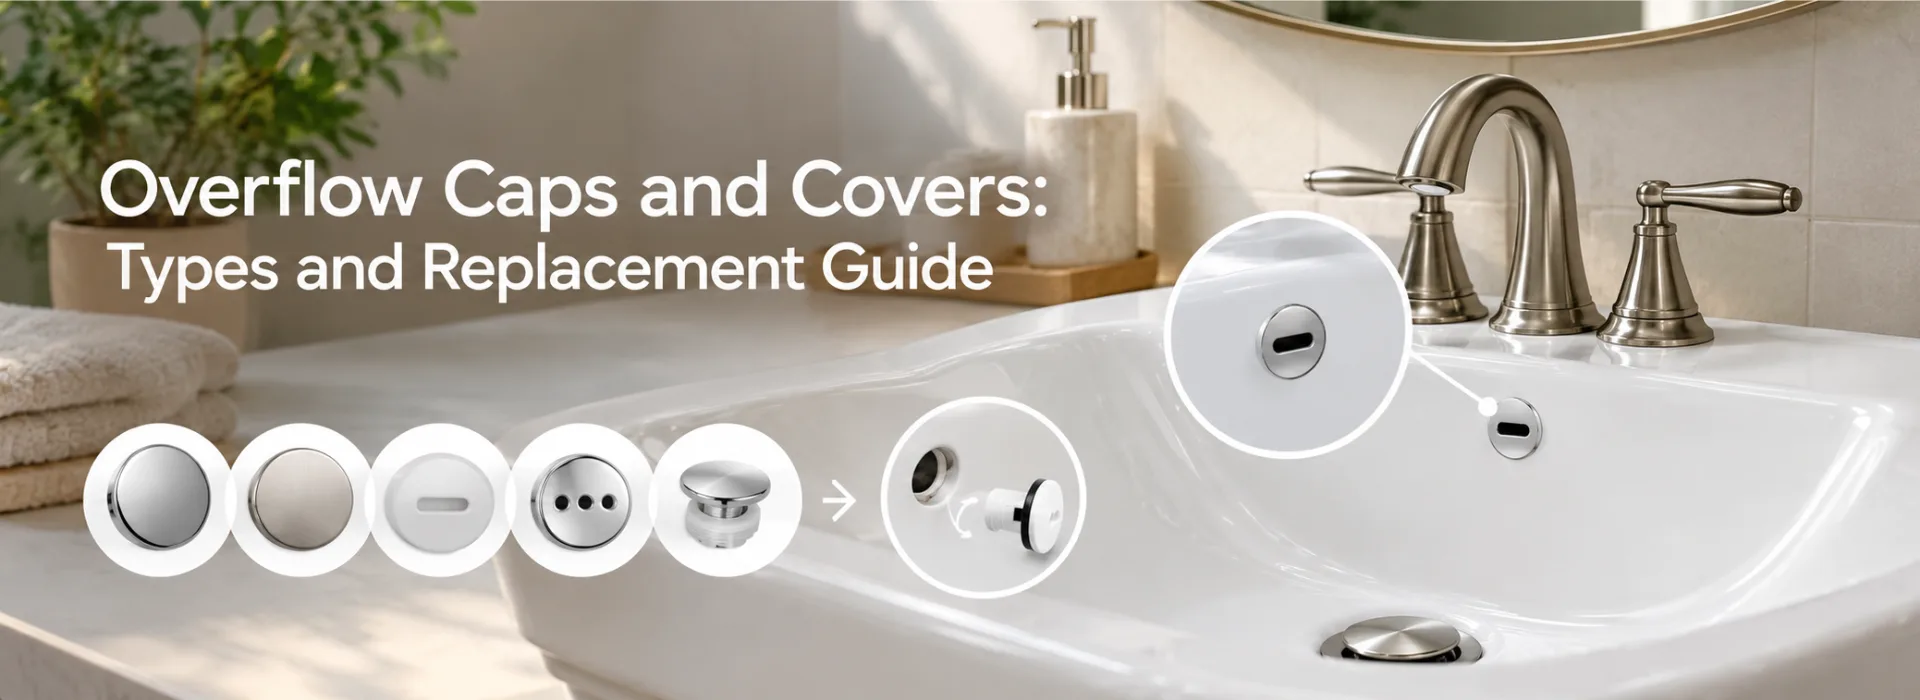
Overflow Caps and Covers: Types and Replacement Guide
Overflow caps cover bathroom sink overflow holes, preventing debris from entering the channel while adding a neat finish. Easy to replace and match.
by Sooraj T. Mathews
Oct 05, 2026
11 minute read
What Is a Sink Overflow Cap or Cover?
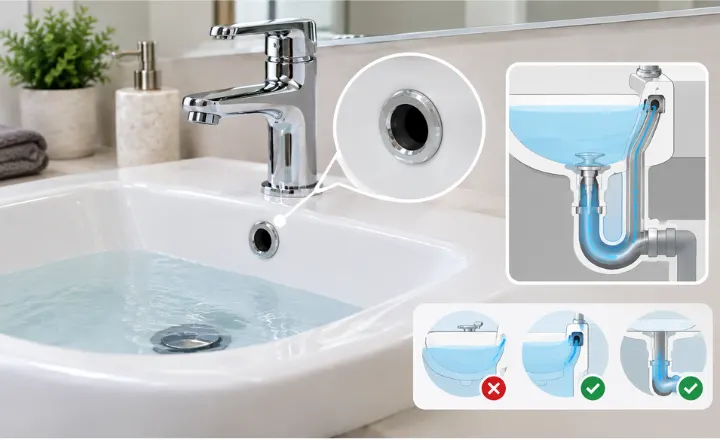
That little hole near the top of your sink isn’t there by accident. It’s part of how the sink was designed — a safety route for water if the drain gets blocked and the tap gets left running. Water rises, hits the overflow opening, diverts through a cast channel inside the basin body, and drains away before it reaches your floor. Most people go years without it actually doing anything, but when it matters, it matters.
The cap is what sits on the outside of that opening. A small plate, usually round or oval, that clips or screws over the hole from the front. Without it the sink looks half-finished and the opening sits exposed, collecting whatever drifts around in a bathroom environment — soap film, limescale, occasionally worse. The cover doesn’t need to do much. It just needs to be there, fitted properly, not falling out. Overflow covers protect the opening while enhancing the visual appeal of your sink.
Worth being specific about one thing: a cover that fully seals the hole is the wrong cover. The overflow channel needs to breathe. Proper covers leave the opening accessible — through gaps in the design, slots, or a profile that doesn’t make contact across the whole hole. If water can’t get in, the overflow can’t work.
Types of Overflow Caps and Covers
Four main types. Which one you need depends on the sink, the existing fitting, and how much you care about the finish.
Snap-In Overflow Covers
Clip in, no tools. Pull out the same way. These dominate the market because they’re cheap and fast to fit, and for a standard bathroom sink in a normal house they work fine. The mechanism is just a plastic clip that grips the edge of the overflow hole — nothing complex, nothing that requires any skill to manage. The failure mode is gradual: the clip loses tension over time, especially if the bathroom gets cleaned with anything abrasive, and eventually the cover starts working loose. A cover that’s had five or six years of regular use in a busy bathroom will often need replacing purely because the grip has gone, even if the face of the cover still looks alright.
Screw-Fixed Covers
One screw through the front face, or in some designs threading in from behind the sink wall. More secure than snap-in — noticeably so. If you’ve replaced a snap-in cover twice already because it keeps detaching, this is probably where you should have started. A screwdriver is required for installation and removal, which adds maybe two minutes to the job and is the only real drawback. Found more often on older sinks and on better-quality fittings where someone specified hardware that would actually last.
Decorative Designer Covers
For bathrooms where the hardware has been chosen deliberately. A decent tap set — proper brushed brass, or a matte black finish, something from a design-focused range — looks noticeably wrong next to a cheap stamped plastic overflow cap. These covers are made to match those ranges. Same manufacturer in many cases, same finish, same weight in the hand. They cost more. On the right sink, beside the right fittings, they’re obviously worth it. In a plain white bathroom with a standard chrome mixer, probably not necessary.
Universal Overflow Covers
Covers designed to fit across a range of hole sizes rather than one specific dimension. The body flexes slightly, or the faceplate is wide enough to span normal variation. Handy when you’re not certain of your sink’s exact spec, or doing a job across several different basins that aren’t all the same model. The fit is rarely as clean as a purpose-sized cover. But it’s adequate, and adequate is sometimes all you need. Choosing the right type depends on your sink design and installation preference.
Materials and Finishes Available
Plastic is the default and the cheapest. For most bathrooms it’s completely fine in the short to medium term, the problems being cosmetic more than structural — yellowing, surface scratches from cleaning, a clip mechanism that degrades faster than a metal one would. Stainless steel holds up better across the board: no yellowing, more resistance to cleaning products, the clip or screw thread stays functional for longer. Brass is the premium material, heavier and warmer in tone, used mostly in bathrooms where the whole fitting set has been chosen with care. The price difference from plastic to brass is substantial and is usually only worth paying when the surrounding fittings justify it.
Chrome is the most common finish and has been for decades — it goes with almost everything and is easy to source. Matte black has been gaining ground steadily, works well in modern monochrome bathrooms, and tends to show water marks less than polished chrome does in practice. Brushed nickel is a warmer, less reflective version of chrome that genuinely hides limescale and water spots better, which in a hard water area is a real advantage rather than just an aesthetic one. Gold and antique brass finishes are back in fashion in period and maximalist bathrooms, and the range available has improved considerably.
The thing that gets skipped: match the cover to your tap and waste fitting finish. Chrome overflow cap, brushed nickel taps — the sink will look slightly wrong and people won’t be able to say why. Get them to match. It costs nothing extra if you’re already replacing the cover anyway.
How to Choose the Right Overflow Cover
Measure the hole. This is the first step and the one most people skip, which is why they end up back at the shop returning something that doesn’t fit. The overflow hole diameter varies between sink manufacturers — some are slightly larger, some are elongated rather than round. A cover a few millimetres too small won’t clip in. A cover a few millimetres too large won’t sit flush. A poorly fitting cover can affect both appearance and function, and it’s an avoidable problem.
Once you have the size, think about mounting type. If the sink was fitted with snap-in, replacing with snap-in is the obvious path. Switching to screw-fixed is doable but the construction behind the overflow hole varies — some sinks accommodate it easily, others don’t have the clearance. Worth checking rather than assuming.
Finish last, cost last. Mid-range covers from a recognisable brand will outlast the cheap unbranded equivalent by a meaningful margin, mostly because the clip mechanism and thread are made to a better tolerance. Buying something cheap that fails in eighteen months and buying it again isn’t actually saving money.
Signs You Need to Replace Your Overflow Cover
Cracked, visibly broken, or not there at all — those are obvious. Replace it.
The less obvious signs accumulate slowly enough that they become normal. A cover that’s been nudging loose for months and needs pushing back in every time the sink gets cleaned: that clip is done, it won’t recover. Chrome that’s developed rust spots or brown staining at the edges: the finish has broken down and it’s going to keep looking worse. A cover that sits at a slight angle or doesn’t lie flat against the sink — there’s often build-up underneath it, limescale or mould that’s lifted it slightly off the surface.
Sometimes cleaning sorts the angle problem. Remove the cover, clean the hole and the ceramic around it, refit — and it sits properly again. Sometimes the cover itself has taken on a slight warp, usually from heat or from being forced at some point, and it won’t sit flat regardless of how clean the surface is. The only fix for that one is a new cover. I’ve pulled covers off sinks where the grime beneath had set so hard it had essentially bonded the cover to the porcelain — not a structural bond but enough that removing it without scratching the sink took considerably more care than fitting the replacement.
How to Replace a Sink Overflow Cover (Step-by-Step)
Quicker than most jobs that involve the word “replacement.”
Old cover out first. For snap-in: a flat-head screwdriver or a dedicated lever tool, working gradually around the edge rather than forcing one side. Even pressure matters — plastic covers will crack if you lever too hard from a single point. For screw-fixed: undo the screw from the front and the cover lifts away. If there’s resistance after the screw is out, the cover may have been installed with additional adhesive at some point. Work it gently rather than pulling hard.
Clean the hole before the new one goes in. There will be something in there — limescale, soap residue, possibly mould around the ceramic edge. An old toothbrush and bathroom cleaner, two minutes of effort. The new cover will seat cleaner and the gap around the edge will look neater. Skipping this step and fitting over whatever’s already there is the reason covers sometimes sit at odd angles straight out of the packet.
Hold the new cover against the hole before committing to fitting it. Check the size looks right, the profile makes sense against the sink surface. If something looks off now it’s much easier to address. Avoid forcing the cover to prevent damage — if it takes real effort to get it into position, the size is wrong, full stop.
Fit it. Snap-in: even pressure across the face, push until it seats. Screw-fixed: position it, drive the screw in firmly without overtightening — plastic threads strip more easily than people expect. Pull the cover once it’s in. If it holds, the job is done.
Common Mistakes to Avoid
Going to the shop without measuring. Most failed replacements come back to this. People find something that looks roughly right, buy it, and get home to find it doesn’t fit the hole. Two minutes and a ruler before leaving prevents it entirely.
Forcing installation. If the cover won’t go in without significant effort, that’s diagnostic information — the size is wrong. Forcing it will either crack the cover body or, worse, chip the edge of the overflow hole in the ceramic. Neither is a useful outcome and neither is easy to fix.
Fitting over a dirty surface. Cover ends up slightly raised, the seal around the edge looks rough, and the clip or screw doesn’t always seat as solidly as it should. Clean the hole first. It’s not optional.
Buying the wrong mounting type without checking. Someone replaces a screw-fixed cover with a snap-in because snap-in was easier to find, then wonders why the cover keeps falling out of a hole that was designed with a screw thread in mind. Or the reverse. Check what’s already there before buying.
Maintenance Tips for Overflow Covers
Work it into the existing sink cleaning routine rather than treating it as a separate task. The face of the cover and the area around it accumulate grime at the same rate as the rest of the sink surface — limescale in hard water areas especially. A wipe-down at the same time as the rest of the basin is all it takes.
Bleach-based products are too aggressive for metal covers with a plated or coated finish. The finish degrades faster under repeated chemical exposure than it does from normal use. Mild bathroom cleaner or soapy water handles cleaning without the damage.
The overflow channel behind the cover is the bit people actually forget. It’s invisible, so it doesn’t register as something that needs attention. Sediment accumulates over time in any pipe that has slow-moving or intermittent water through it, and the overflow channel qualifies. Running water through it occasionally — pouring directly into the overflow hole, or working a thin brush through the opening — keeps the passage clear. If the channel is partly blocked when it’s actually needed during an overflow event, it won’t drain properly. That defeats the entire point.
Do Overflow Covers Affect Drainage?
Not when they’re right. A cover sized correctly for the hole doesn’t restrict airflow or water movement through the overflow channel — it sits over the opening, not across it. The overflow channel itself contributes to drainage under certain conditions, so sealing it off would create a problem where there wasn’t one before.
The scenarios where drainage does get affected: a cover that’s slightly too large and inadvertently blocks the hole rather than framing it, or a channel that’s furred up inside from years of sediment. Sluggish draining in a basin where the waste pipe seems clear — before assuming there’s a blockage further down the pipe, check the overflow channel. It’s a quick check. Always ensure proper fit to maintain drainage performance. Often it’s not the issue, but ruling it out takes less than a minute.
FAQs
Are overflow covers universal?
Some are marketed as universal and work across a practical range of standard sizes. Not all sinks fall within that range though — older basins and anything with non-standard dimensions from the manufacturer may sit outside what a universal cover can accommodate. For a modern bathroom sink from a mainstream brand, universal will usually do. For anything else, measure the hole before committing.
Can I replace an overflow cover myself?
Yes, easily. It’s one of the least complicated maintenance jobs a bathroom has to offer. Snap-in types need no tools at all. Screw-fixed needs a screwdriver. The part most people find unexpectedly difficult is getting the old cover out if it’s been in place for a long time — not because it’s technically hard, just stubborn.
What size overflow cover do I need?
Remove the old cover and measure the hole directly. Internal diameter, and note whether it’s circular or elongated. That measurement is what you need at the shop. Manufacturer documentation will give you the same number if you can find it, but measuring physically is faster and more reliable than searching for paperwork from a sink installed a decade ago.
How often should I replace it?
No interval. Replace it when it fails, looks bad, or won’t stay in. A well-made cover in a maintained bathroom will last years. There’s no reason to replace something that’s working and looks fine. When it stops working or stops looking fine, replace it then.
Conclusion
The overflow cover is easy to overlook because it doesn’t do much in daily use — most of them go the whole of their working life without a drop of water ever actually passing through the overflow channel. But it protects the opening, it finishes the look of the sink, and when it deteriorates visually it has a disproportionate effect on how the whole basin reads. The replacement job is minimal: measure the hole, buy the right type and finish, spend ten minutes fitting it.
Upgrading your overflow cover is a small change that can significantly improve your sink’s look and functionality. Match the finish to whatever’s already in the bathroom, don’t skip the clean before fitting, and don’t force something that isn’t the right size. None of this is complicated. It’s just the sort of thing that’s worth doing properly the one time you do it.
-min (1).png)
Sooraj T. Mathews
Sooraj is a content creator with 6 years of experience and a knack for making SEO work feel like storytelling. With 4 years in the digital marketing game, he blends strategy and creativity to craft content that clicks and converts. Outside of work, you'll find him unwinding with a good puzzle or getting lost in a great book—always curious, always learning.
.webp)
.webp)
.webp)
.webp)